| 1. |
Description of the lock data
(Information by Snap, see topic at LotB)
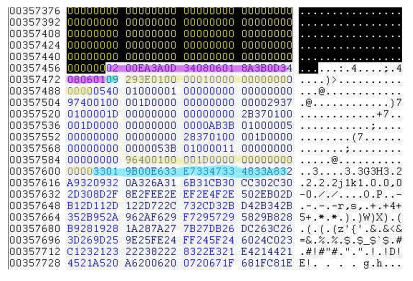
The first byte is always a counter, that determines the number of records
for the different locks (in the picture this counter has the value 09, it
is marked in bright green)
The counter is followed by the records for the locks, each records has a
length of 14 Bytes and is structured like this:
| Offset |
Bytes |
Values (hex) |
| 00 |
2 |
Grid number |
| 02 |
1 |
01 (fix) |
| 03 |
1 |
trap level |
| 04 |
1 |
trap type |
| 05 |
1 |
Key/lock ID |
| 06 |
8 |
00 (fix) |
|
|
|
(in the above picture the first an the last record are
marked in yellow)
|
|
- Grid number: Coordinate of the object (door, box etc.), that
should be locked. Has to be entered as a hex value.
- Trap level: Determines, if the trap can be easily or hardly
discovered. Level 15 (0f hex) won't even be discovered by the best
mercenary.
- Trap type:
Known trap types:
|
Hex
|
Trap |
| 01 |
explosive |
| 02 |
electric |
| 03 |
siren |
| 04 |
??? |
| 05 |
??? |
|
|
- Key/lock ID: With the Lock ID keys are matched to a lock. A
lock can only be opened with a key, that has the same ID. You will
find a list of all id-values in the file locks.bin in \data\binarydata.slf.
A list of all lock IDs (by Snap):
| Lock ID |
Key |
????? |
| 00 |
Crate key |
00 00
00 0a 19 |
| 01 |
Tough crate |
00 00 00 0f 38 |
| 02 |
Queen |
04 00 00 4b 64 |
| 03 |
Cheap house |
02 00 00 11 2d |
| 04 |
house |
03 00 00 18 3a |
| 05 |
Metal door |
04 00 00 32 50 |
| 06 |
padlock |
05 00 01 1e 4b |
| 07 |
Avg Electronic |
06 00 02 28 46 |
| 08 |
Queen |
06 00 02 50 50 |
| 09 |
pass Normal |
07 00 03 32 4a |
| 0a |
pass tough |
07 00 03 4b 50 |
| 0b |
Passcard Orta K4 |
07 00 03 fe fe |
| 0c |
Brothel Back
Door |
02 00 00 41 41 |
| 0d |
Tixa Cells |
01 00
00 3c 78 |
| 0e |
solid house |
03 00 00 24 4b |
| 0f |
ACA cells |
01 00 00 1e 46 |
| 10 |
San Mona Hotel |
03 00 00 20 44 |
| 11 |
Very tough crate |
00 00 00 24 4a |
| 12 |
Alma cells |
01 00 00 41 5f |
| 13 |
Warden |
04 00 00 37 50 |
| 14 |
Alma metal door |
04 00 00 4b 5f |
| 15 |
Alma garage door |
04 00 00 28 4c |
| 16 |
Arena entrance |
03 00 00 55 5f |
| 17 |
Arena guardrooms |
03 00 00 14 32 |
| 18 |
Tixa Metal door |
04 00
00 26 50 |
| 19 |
Orta basement |
06 00 02 fe fe |
| 1a |
Orta control
door |
04 00 00 4b 78 |
| 1b |
Orta pass Ernest |
07 00 03 4b 50 |
| 1c |
San Mona Desk |
00 00 00 37 6e |
| 1d |
Medical
warehouse |
04 00 00 3c 78 |
| 1e |
Delivery
warehouse |
03 00 00 32 78 |
| 1f |
Shooting range |
07 00 03 3c 78 |
| 20 |
Doreens Stash |
04 00 00 32 78 |
| 21 |
Grumm Nmap
warehouse |
04 00 00 5a 78 |
| 22 |
Grumm Smap
ACAstash |
05 00 01 50 78 |
| 23 |
Meduna Air
barracks |
06 00
02 5a 78 |
| 24 |
Meduna Sam
lockers |
05 00 01 50 59 |
| 25 |
Palace Door |
04 00 00 55 78 |
| 26 |
Hicks crate |
00 00 00 19 38 |
| 27 |
Alma Metal door |
04 00 00 37 5a |
| 28 |
JA25 guardpost
workshop |
03 00 00 18 3a |
| 29 |
JA25 guardpost
office cabinet |
00 00 00 19 38 |
| 2a |
JA25 guardpost
warehouse |
03 00 00 20 44 |
| 2b |
Fung |
03 00 00 2e 4b |
| 2c |
powerplant metal
door |
04 00 00 3c 78 |
| 2d |
Sewer gate |
04 00 00 41 18 |
| 2e |
Sub1 elec |
06 00 02 50 50 |
| 2f |
sub1 special
door |
04 00
00 78 78 |
| 30 |
sub2 metal door |
04 00 00 78 78 |
| 31 |
sub2 storage |
04 00 00 50 5a |
| 32 |
sub2 office |
04 00 00 32 5a |
| 33 |
sub3 room1 |
06 00 02 78 78 |
| 34 |
sub3 room2 |
04 00 00 78 78 |
| 35 |
sub3 middoor1 |
04 00 00 50 78 |
| 36 |
sub3 enemyrooms |
04 00 00 32 32 |
| 37 |
sub3
getsmartdoors |
06 00 02 78 78 |
| 38 |
sub3
controlrooms |
06 00 02 78 78 |
| 39 |
morris door |
06 00 02 50 50 |
| 3a |
Unopenable Door |
04 00 00 78 78 |
| 3b |
Ununsed 59 |
00 00 00 00 00 |
|
|
|
|
| 2. |
Inserting locks in a map |
|
The lock data has to be inserted with a hex-editor in the
map file.
Before you start, it might be useful to calculate the additional bytes
needed for the locks.
There are always 1 byte for a counter and 14 bytes for each lock:
y = 1 + (n x 14) where n is the number of locks.
So 5 locks would make 71 bytes, 9 locks 127 bytes.
You may also copy the lock data from another map and alter the single
bytes. This can be useful, if you are not sure, whether you found the
right offset or not. At least the symbols with the keys should appear in
the map editor, even if they are not at the right place.
Where to insert the locks information ?
This question is not easy to answer, because the structure of the file is
different in most map-files. The offset is always at the end of the map
data. The lock-data must be inserted after the data of the exit-grids,
which comes after the data of the person descriptions. In many, but not all,
maps the lock data is followed by a string, which we will call
'Block-String'. (The meaning of this string is still unknown.)
- Maps with 'Block-String'
If the 'Block-String' exists, it is easy to find. It is a Hex-String with
the following structure (see bright blue data in the picture above):
NN 01 NN 00 e6 33 e7 33 47 33 48 33 ... (N = variable)
(In some maps i have seen slight variations of the
block string. If you are not sure, whether you found the right offset you
better use method 2) or 3) to insert the lock data.)
The bytes with the lock data must go right before the
'Block-String'.
This method, using the Block-String as a fixpoint is not recommended,
because the data before the inserted locks is important. If there are no
exit grids in the map, the last byte with the value 00 right before the
block string must be deleted.
- Maps with exit grids
The part of the map, that contains the data of the exit grids is the best
fix-point to find the offset to insert the locks. The lock-data must be
inserted after the data of the exit-grids.
The lock-data and the data of the exit grids have a similar structure:
- first byte is a counter
- second byte is always 00
- data blocks with 7 bytes for each exit grid
| Offset |
Bytes |
Meaning |
| 00 |
2 |
Grid Number |
| 02 |
2 |
Destination
grid number |
| 04 |
1 |
Destination
sector, x-coordinate (1, 2, 3...) |
| 05 |
1 |
Destination
sector, y-coordinate (A, B, C...) |
| 06 |
1 |
Destination
Basement Level |
|
With this information the exit grids are easy to find (search for the
grid number). You can calculate the length of the exit grid-data with
this formula:
y = 2 + (n x 7) where n is the number of exit grids
So you have 9 bytes, if there is one exit grid in the map, 16 bytes for
two exit grids, 37 bytes for 5 exit grids...
(See the picture above. In that map are two exit grids, the data is
marked in violet)
(In some cases you must delete one byte with the
value 00, that follows after the data of the exit grids. Otherwise the
map-editor will crash after you have inserted the locks and try to load
your map.)
-
Maps without exit grids
Of course you will have maps without any exit grids. In this case things
will get complicated, because there are several bytes with the value 00 as
placeholders between the person descriptions and the block string (if it
exists), that must be deleted.
But this problem can easily be solved: Before hexing in the lock data you
insert an exit grid with the editor somewhere in the map, and search for
the grid number with a hex-editor. After you have inserted the lock-data,
load the map again with the editor and delete the exit grid.
|
| 3. |
The Keys |
|
Keys are items like weapons, gas masks etc.
You cannot place them with the UB-Editor, but that doesn't matter, because
thanks to LotB (Deutscher) we know the hex-values of all items including the
keys.
There are two ways to get the keys into the game: As an item, that is placed
somewhere in the map or that is hexed in a person's inventory.
How to get an item into the inventory has already been explained by
Deutscher, so here you will only find a description for hexing the keys
directly into the map.
a) Items have a counter, too, but we don't want to bother ourselves with
searching for that counter. It is much easier to change an existing item to
a key.
So use the map editor to put any item (for example the canteen, hex d6 00)
at the place where the key should appear. Open the map with a hex-editor and
search for the grid number of the item. The item data is located before
the data for the light. If that data exists you can find an entry like
L-Rxx.LHT. But in nearly all cases you can find the offset by just searching
for the grid number.
b) The item data consists of records of 52 bytes for each item.
| Offset |
Bytes |
Hex/Meaning |
| 00 |
2 |
Grid number |
| 02 |
4 |
00 |
| 06 |
2 |
item type |
| 08 |
1 |
Number of items |
| 09 |
1 |
00 |
| 10 |
1 |
status |
| 11 |
5 |
00 |
| 16 |
1 |
Key/Lock ID |
| 17 |
21 |
00 |
| 38 |
1 |
01 |
| 39 |
6 |
00 |
| 45 |
1 |
ff |
| 46 |
1 |
? |
| 47 |
3 |
00 |
| 50 |
1 |
01 |
| 51 |
1 |
00 |
|
After we have found the right grid number, we only need to care about bytes
6 and 7 (item type) and byte 16 (key id).
c) Using the example of the canteen bytes 6 and 7 would be d6 00. We
overwrite those bytes with one of the following values:
|
Hex |
Key Type |
| 0f
01 |
small key |
| 10
01 |
prison key |
| 11
01 |
cheap key |
| 12
01 |
dull key |
| 13
01 |
shiny key |
| 14
01 |
padlock key |
| 15
01 |
electronic key |
| 16
01 |
key card |
|
d) The last step is to overwrite byte 16 with the ID of the lock, that the
key should match to.
Hints:
- Take care, that there are not too many keys and locks with the same ID,
especially for important locks.
- Take care, that the key and the lock really match. So for example
don't use a key card for a wooden door.
- For those big doors, that extend over 2 tiles, you must insert 2 locks
with identical values.
This tutorial was released in German by Sinclair on
19th of December 2001
translated by Azrael
|
|
|
|
|